Sunday, January 31, 2010

One Project Leads To Another!

My guest room needed a finishing touch so I ordered some new curtains. They're black and cream gingham with a ribbon trim. Love them! I thought I was done, 'til I looked at the 9' x 28" built-in bookshelves that are tucked in to the left of the left-hand window. Boring and plain. I decided they needed some "pop."


 The room is a soft yellow, the ceiling, trim, closet doors, window blinds and duvet are white. I picked black and cream toile fabric and black/cream ticking for the linens. The classic combo. It's a departure for me (read: frilly) as I'm pretty restrained when it comes to patterns. My uber-talented sister Leslie sewed a slipcover for the headboard, and covered some pillows in the same fabric for me about two years ago. I've said it before, she's a whiz at the "needle-y arts!"

The last time I tried using a sewing machine was in 8th grade Home Ec. at Locust Valley Junior High. I made a very lame peasant skirt and an even more lame tennis dress, and I never looked back. I have no patience for "close work" like that. Gimme a creme brulee torch, a paint brush or a sledge hammer, and I'm a happy girl.

In a perfect world, I'd tear down the ceiling, take off the paneling and rip out/rebuild the closets and shelves. Oh, and have baseboard heating installed. But that's not happening since I directed "many zeros" toward repointing the brick and re-stucco-ing the entire outside back wall. And so, we spruce!
The bookshelves are too plain.

I was going to wrap the shelves in fabric and call it a day, but instead I decided to paint the shelves (tops and bottoms) and inside walls with glossy black paint. I put toile-patterned contact paper, more formally known as "self adhesive decorative covering" on the back wall and finished off the front of each shelf with trim. I used trim called "gimp" which is a woven band of fabric, but you can use "rickrack" which is a zig zag, or trim with pom poms (go nuts!) or plain ribbon. Or use nothing. I like the finished look of the 1/2" gimp, and the contrast against the paint...so everything's not so dark. 


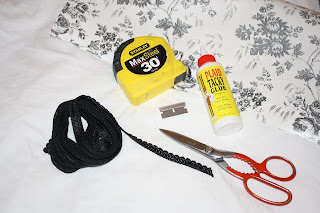
Supplies you'll need:


Paint, brush and rag (I used leftover glossy black that I had from repainting a wrought iron railing)
Contact Paper
Trim
Craft Glue (dries clear)
Scissors
Straight Edge Razor Blade (to make the final cuts to the contact paper once it's in place)
Measuring Tape

First, open the window a crack to ventilate!
Paint the inside walls, tops and bottoms of the shelves, and leave the shelf fascia yellow, for some contrast when the trim is applied.  Leave the back wall unpainted---no need to waste paint or energy. The paint was thick, so I only needed one coat.

Measure out and cut lengths of gimp. Run a light bead of craft glue on the top backside of the trim and press it onto the front of each shelf. The glue does dry clear, but a dab'll do ya.
This 1874 house is not level or plumb...and some shelves were not 100% straight. This is a cosmetic fix, not a carpentry project--I didn't want to open a can of worms by rebuilding! The back wall of each shelf was a different measurement. I left some overage for each, placed the contact paper straight-on and used a razor blade to cut off the excess. Smooth it as best you can, and if there are stubborn air bubbles, make a slit with the razor blade and force the air out. It's a busy pattern...no one's going to see any marks!
Almost finished!

Doesn't that just look better? I think so!

Total time invested: 2.5 hours + paint drying overnight
Total cost for curtains and shelf update: $75.00

4 curtain panels...$50.00 from http://www.bedbathstore.com/ 
Contact paper...$15.00 incl shipping for 1 roll, from http://www.amazon.com/  
Gimp...$10.00 for 14' from M&J Trimming in NYC
Re-used curtain rods
Used leftover paint
Already had the glue and tools

Oops, let me get those scissors off the floor. On to the next project!

Saturday, January 30, 2010

The Dead of Winter

17 degrees Farenheit, with a "Real Feel" of 5 degrees. OUCH!

It's very dry and bitterly cold here in NYC on January 30th. No matter what Punxsutawney Phil will reveal on Groundhog day, seeing his shadow or not, we'll be in winter for at least 8 more weeks. You can bank on a gross, sloppy snow in early April, too. But let's not get ahead of ourselves.

"What the...?"

Aromatherapy is crucial to me...to bring about a sense of calm and to evoke warmth. I have a cinnamon candle in the kitchen, an evergreen candle in the living room, and a pear spice soy candle in my master bedroom. Ahhh!

How does one prepare to face 5 degrees? I use coconut shampoo and a citrus shower gel--it's a temporary fake-out but it makes me feel good and I dream of my vacations. This morning, I bundled up and headed out on my errands. Within a few minutes, the bones in my fingers were aching, even in heavy gloves. There was no pump-jockey to be seen at the gas station, of course. My fingers were already shaped like the steering wheel when I got back into the car. In the supermarket I passed some pale and wan navel oranges and tomatoes that were pink rather than tomato-red. *Sigh*

Lo and behold, my salvation was waiting for me at home...little did I know that Cindy and David had handed me a bag of heaven when they came by to go to dinner last night. We all know you can get oranges shipped from Florida...but I thought there was a blight due to the US-wide frigid winter. 

The bag contained 4 HoneyBells, sent north by Cindy's mom. She warned me that I'd better eat them over the sink. After a season of underwhelming, dry navel oranges and not very sweet clementines, I was looking forward to trying these!

Oh, my word! May I just say that HoneyBells are so, so juicy to the end, that for the first time in my LIFE I slurped juice from the rind like liquor from an oyster shell. And I do love to do that!  I'm S-O-L-D.

This is my new and never to be altered request for a Christmas present from my sainted mother who resides in Florida. Mommy, are you reading this?!

That's right, I call my mother Mommy.

Here's the skinny. Although touted as "the sweetest oranges in the world" HoneyBells are actually tangelos, a hybrid between a tangerine and a grapefruit. But there is no hint of sourness. They are only available for a few weeks in January...so if you've missed the boat for this season, get on that ole interweb and put in your order for January 2011.

Thanks Cindy and David, for warming up the coldest night of the year!

Monday, January 18, 2010

All That Glitters...


..is NOT gold. Unless you're Donald Trump. For the rest of us, it's usually brass, with a too-shiny finish. I truly appreciate original fixtures--whether it's a cut glass doorknob with old brass fittings, wrought iron or old brass hardware. I bring them back to life where and when possible. My parents scored a box of heavy brass doorknobs with "Public School City of New York" carved in relief...and we had them on our bedroom doors as kids. Loved those. My brother Tim has installed some of them in his home--they look great and the memories carry forward!

What I don't like is the orange-y looking new 'brass' plated fixtures with a shiny varnish. New doorknobs suffer from this, for the most part. If you're not restoring vintage fittings, or installing new fixtures with an old world finish such as oil rubbed bronze, brushed nickel or copper, you can treat the metal to dull that glare! A light rubbing with fine steel wool gives them a brushed bronze look.

My wood burning fireplace doesn't have a damper in the flue, so I have to keep doors on the front to keep the heat in the house! I'm not a fan of fireplace doors, having grown up with big, open stone and brick fireplaces with antique screens and fenders.

I just repainted the living room, and now the brass surrounding the glass doors looks kinda cheesy to me.
I decided that the doors should play a quieter role, and that I'd dull them and then paint them matte black.

Supplies you'll need:
Grade #2 Steel Wool (Fine is 0000, moving to 000, 00, 0, 1, 2 and 3 for very Coarse)
Blue Painter's Tape (or Masking Tape)
Klean-Strip Easy Liquid Sander Deglosser
Rust-Oleum High Heat Enamel Spray Paint in matte black (also good for the BBQ grill!)
Rubber Gloves
A Rag
Old Newspaper
Small Glass Bowl


Start to finish the project took just over 1 hour. 30 minutes of active prep and work, and about 30 minutes of drying time between the 1st and 2nd coats of paint.

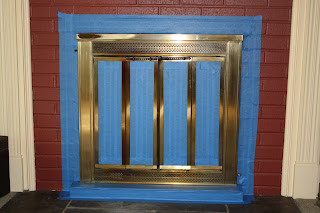
1. Cover the glass and immediate surrounding area with blue painter's or masking tape.


2. Dull the brass by rubbing with the steel wool back and forth, rather than in circles. You want to get the varnish off, not gouge the brass. Just rough up the surface.
3. Put newspaper on the hearth. Shake the liquid deglosser, and squeeze some into a bowl. Wear a rubber glove! Soak the rag and dab the deglosser on to the brass, leaving a visible coat. This will ensure that the paint has a uniform surface to adhere to, in case the steel wool missed some spots of varnish. Let it dry for 10 or 15 minutes.


4. Open a window or door for ventilation. Shake the spray paint for at least a full minute, and spray in an even motion, left to right along the top and bottom, and up and down for the sides, edges and doors. Spray lightly so that you don't get globs and drip marks. Let the 1st coat dry for at least 30 mins, then do a 2nd coat.


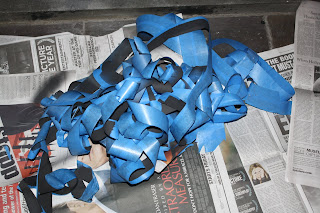
5. Remove the tape. Takes longer to put on than it does to take off!


6. Light my fire!
Final touches for another day:
*Clean the glass inside and out (those are smoke marks.)
*Touch up any areas where the spray paint strayed, with leftover Boston Brick paint.
*Rub down the hearth with Murphy's Oil Soap.

Tuesday, January 12, 2010

Sloppy Joe The Electrician

It's just a faint, faint echo now, but I can still hear my ex saying, "Step away, this is not your arena!"  Condescending, much? Ok, so I'm not an architect or a construction project manager...but I do have some good common sense. He got an electrician on the cheap (first clue) from the pizza man on the corner (second clue), and I'm pretty sure the guy was unlicensed. Ever hear the saying, "You can pay me now or you'll pay me later?" He'd get out of his truck with it's trash-stuffed windshield, in a cloud of cigarette smoke, all greasy and stinky. He literally left a vapor trail as he went from room to room. Yuck. Turns out he was just as sloppy in his work.

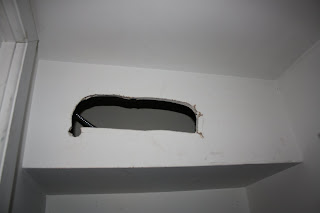
I cleaned up (read: paid for) the mess after my ex exited, and my (licensed) electrician has done his share of shaking his head. Indoor wiring and conduit used outside, uncapped wires snaking out of a pull box without a cover, test holes in the 100+ year old tin ceiling in the kitchen, etc...  It's all been taken care of, but one gaping 16" x 9" hole in a soffit revealed itself recently when I emptied out a den closet. Yes, he did need to access the area to pull wires, but what kind of a contractor (or husband) doesn't patch up a hole like that?

Anyway. This drywall repair job took me 15 mins at the front end to prep and patch, 24 hours to dry, and 15 mins at the back end to sand and paint.  No big whoop.

Tools you'll need:
Self Adhesive Wallboard Tape
Joint Compound
Square Drywall Repair Patches (I bought 1  8" x 8" at Home Depot, and I had 2 smaller ones on hand)
4" Wide Putty Knife
Sandpaper--220 grit
Touch Up Paint--white satin, in this case.


The whole job cost $4.75 because I had everything I needed, except for the larger repair patch. I won't count the roundtrip on the subway, because I passed by Home Depot and picked the patch up on my way to a birthday party in Chelsea.

1. Prepare the surface. Sand the edges of the cut area, and wipe the area clean of dust.

2. Remove the paper backing from the metal patches and apply over the hole. They have self adhesive tape around the edges, but I used a little extra from the roll, for the top of that middle patch to make sure it stayed in place.


3. Apply Joint Compound using the putty knife. Like I've said, it's just like frosting a cake. Spread it evenly, and extend a bit beyond the repair area. Let dry for 24 hours.

Goes on dark gray...


...dries light gray.

4. Finish the surface by sanding smooth, but not so far down that the mesh peeks through! A quick once-over with white satin paint, and the soffit is as good as new.

Twister, anyone?

PS. I threw away the keys to the Bitter Bus years ago, but every once in a while, I wonder if it was fully HIS arena...

Clutter Busters

2010. Been here 20 years! I'm looking around my place with "new eyes." I've done a lot of fixing and sprucing over the years, but I'm waking up the rooms by de-cluttering and freshening up.

I had a shelf-less armoire tucked into the corner of my home office and it was filled with linens, blankets and old towels. I hadn't seen or used the ones toward the bottom in years. I have a different sized bed, now. Purge alert! I cut the towels into rags for the house and car and I made room on a closet shelf for the linens I actually use. I put an extra comforter, blankets and pillows in an extra large Space Bag, vacuumed out the air and vwah-lah, I stashed it under my bed!


Time to pay the armoire forward--I found it on the street 15 years ago and refurbished it for about $20. Within a few minutes of putting it out with an "I'm Free" sign, a construction worker was looking it over. He said he does light carpentry, and would build the shelves. I was impressed that he carried it off---I had to roll it home years ago, screeching along on city blocks! I got my money's worth and he's happy to give his "street find" a new life.


I used the older sheets as dropcloths and to protect the furniture I couldn't move very far when I painted the living room last weekend. I can only do so much. The duvet and sham covers were in good shape so those went to the Salvation Army.

I took a good look at the bookshelves and culled 50 books that I've already read or referred to (old book club selections, a Spanish Dictionary, Golf Quotations, All Marketers are Liars, etc...) and will never look at again. I've been using my library card rather than buying books on Amazon.com. I'm donating the books to the Locust Valley Library this weekend. I'll hang onto a freebie I picked up years ago in the US Airways Shuttle terminal, as it's still quite relevant: "A Survival Guide to the Stress of Organizational Change."


There were a few stacks of magazines in the den, my room, the living room and my office.

All together, there are over 100. Didn't seem so bad when they were scattered!  I subscribe to 2 or 3, and the rest are 'hammy downs' from friends. Some that I'd stashed in the bookcase dated from 2000. Those are mostly 'cooking for the holidays' issues, which are comforting to look at. But not if I haven't done so for 10 years.


Every few nights, during this arctic blast, I've lit a fire, popped in a CD and I get thru about 10 issues. I'm snipping out only the most enticing pix and recipes...for my kitchen and home inspiration files.

The rest goes out for recycling!

Prepping for my 2009 taxes, I gave the shredder a good workout on old bank statements and extraneous papers and proxies from my filing cabinet. I've opted to get them online now...so hopefully the worldwide data base holds up. I guess these are resolutions of a sort, but I prefer to give in to the urge to purge, when it strikes. Otherwise the list might be too daunting!

Sunday, January 3, 2010

Sundays Are For Soup

Turkey, White Bean and Spinach Chili

Here's an easy and satisfying soup (it's more than a soup, kind of a chili and almost a stew) to make on a wintry Sunday afternoon.
6 servings
25 minutes from stovetop to table!

1 Tbs olive oil
1 medium yellow onion
1 pound ground turkey (not extra lean, a little fat adds flavor!)
4 Tsp chili powder (mild to 3 alarm (!) whatever your preference)
1 Tbs ground cumin
1 can (28 oz) whole tomatoes in thick puree (chopped)
1 can (15 oz) cannelini beans (white kidney beans), rinsed and drained
1/2 cup water
1/2 bag of fresh spinach
1 dollop sour cream per serving
Grated white cheddar cheese for garnish


Heat oil in a dutch oven or soup pot, add chopped onion and cook 5 mins til carmelized
Add ground turkey and cook 8 mins, breaking it up with a wooden spoon, til no pink is left
Stir in cumin and chili powder and cook for about 1 minute
Add tomatoes with the puree, the beans and 1/2 cup water and bring to a boil.
Stir in the spinach, lower heat and simmer 10 minutes.


It's very good over Jasmine rice made with a little butter and salt. Garnish with sour cream, grated white cheddar, or a piece of corn bread.


Looking forward to Monday's lunch. I put the rest into single serving containers---chili-oop freezes very well.


15 Minute Fixes

I'm so glad I'm already back home from the holiday swirl, and not traveling or fighting the traffic on this gray, blustery New Year's Sunday. I have a pile of magazines to get through, The New York Times has been delivered and though they're tempting me, I have a few things to get done before settling in to read.

I took a spin through Home Depot yesterday to get the stuff I need for some minor projects.

Among other things, I picked up a matchstick bamboo shade to smarten up the den window. The curtains have faded from the sun, they're outdated and they were way too long from the start. I got them on sale when Waverly was closing up shop. I was bunching the left panel up so it wouldn't block the radiator. So wrong.


It was too bright outside to open the curtains in the daytime and I had to keep them closed at night for privacy--and the den was like a dungeon. It's been bugging me for awhile.

I chose a Mirada Natural Bamboo Roman Shade, for $21.00 and it took less than 15 minutes to install. (It comes with a retro-fit kit if you want to convert it to a cordless shade---this is very important for safety if you have children, pets or some kind of restraining order.)

Tools Needed:
Screw starter (it's an awl with a threaded tip)
Philips head screw driver for the cord cleat
Pliers to turn the eyehooks (it's hard toward the end with bare hands!)
I also took the opportunity to fill in some minor separations in the molding with caulk (that's the white stuff you see on the window frame below the eye hook.) Like your skin in winter, wood dries out. It can crack, split or leave a space. Zip, zip with some caulk and touch up paint, and the window frame will look neat and clean.

Screw in the two eyehooks, and hang the shade. DONE!!

Since my basement level is finished liveable space rather than storage-only, I've done what I can to mask the valves and pipes that run through the den. Industrial chic! The circuit breaker is behind the wooden cabinet. Thankfully the club chair hides the water meter and the Verizon FiOS 'command center.'


I picked up sage green "blackout/energy saving" curtain panels at Bed Bath & Beyond. Less than $50 for the pair, with their weekly 20% off coupon. Gave them a quick once over with the iron, and re-used the curtain rod.
I slapped some paint on that silver outlet under the circuit breaker, and now it blends into the wall.


Feet up, faux fire going, Food Network on the flat screen. A cup of tea and the NY Times.