Monday, November 23, 2009

DIY Apple Pie

Mrs. Smith has a nice business for herself selling mass produced pies, Costco sells 'em the size of a manhole cover for less than $10 and there are tons of bakeries where one can pre-order for the holidays, or pick up a pie on the fly. 

Baking for the holidays is a real joy for me, and so I go the home-made route all the way. I try to plan ahead...shop for the fruit and make the dough and fillings a day or two ahead. That way, I'm not in the kitchen til 2am the night before a drive, or clogging up someone else's oven to bake, the "day of."  Best to stay out of the host's way...

"Yeah, could you move that turkey? I'm gonna need your only oven for an hour for this here pie!"

I'm making apple and pumpkin pies for T-Day, and will add cheesecake and a gluten free Buche de Noel for the round of stops at Christmastime. I usually ship cookies to more far flung friends.

The Joy of Cooking recipe for apple pie is tried and true, and I've never wavered. I make piecrust dough in the Cuisineart using the basic flaky pie crust recipe that came with the machine. Before baking, I brush the top crust with milk (don't say eeewww--if I didn't tell you, you'd never have known!) I plunk down some cookie cutter shapes pressed from rolled out scraps, then sprinkle all over with cinnamon sugar. Yum!

HAPPY THANKSGIVING!


Sunday, November 22, 2009

Red Hook, Brooklyn

A few snaps from a short wander around Red Hook today. I'd like to go back soon to explore some more.


Saturday, November 21, 2009

When White Is No Longer White

 Even though I scrub the bathroom every week, the caulk between the tub and the wall manages to look a tad grubby after about 6 months. I like the bathroom to sparkle, so before the traces of mildew approach "moldew" status, I add "Re-caulk Tub" to my to-do list.


In the grand scheme of things, this caulk was not too far gone, but for me, it's like going out to dinner with dirty nails. Not happening!

There are a few kinds of caulk, and you want to be sure to use the right formulation for the job! For Kitchen and Bath jobs ABOVE the waterline, use a caulk that is waterproof, cleans up with water, and is paintable (not that you'll paint in the tub, but better safe than sorry in case you're touching up other areas that meet a painted wall/molding/ceiling.) Non paintable caulk is like oil & water---paint will not adhere. I learned that lesson the ugly way.


For small kitchen and bath jobs, I prefer DAP KwikSeal, Bright White. It also comes in clear--which is good around faucets. Look at the tube before you buy!  They all say they are mildew and mold "resistant" but I have yet to find one that seals out mildew 100%. If you know of a brand that does, please share with me!

For other caulking jobs around the house (indoors and out) for filling in gaps between molding and walls/ceilings or around doors...I use DAP Alex Plus Easy Caulk (pictured below.) It's acrylic latex + silicone, paintable and it cleans up with water. The best feature is that it has a bendable nozzle, I can hold it in one hand and I don't have to wrestle with a large canister and a caulking gun.

Back to the bathtub.

The tools you'll need for this quick job are:
  • Screwdriver or small chisel
  • Utility Knife (or boxcutter)
  • Straight Edge Razor Blade
  • A Dry Rag and a Damp Rag

1. Please, as tempting as it might be, do NOT apply new caulk over existing caulk! It will not adhere and you'll have a wrinkly wet mess.

Using the screwdriver, dig out the old caulk. Slit it with the boxcutter to make the job easier, and just pull it off like old gum. Clean up any stubborn caulk residue with the razor blade. Be careful not to gouge the tub if it's fiberglass. Porcelain can take more scraping!


2. Clean out the area with a dry rag so there are no loose bits then wipe the seam down with rubbing alcohol. The seam has to be clean and dry before applying new caulk!

3. Use the razor blade to cut a SMALL 45 degree piece off the caulk tube's nozzle. If the cut is too big, the caulk will come out too fast and you'll have a mess on your hands, literally.


4. The best tools around for smoothing the bead of caulk into the seam, are your forefinger and your thumb! Your fingers give you the best control, and you can push the caulk in more evenly. I have never used the tool pictured below, and it's been in my toolbox for over 20 years. (The purple tiles are a tip off!) I doubt a pro would ever use it.


5. Slowly squirt a bead of caulk along the seam, then smooth it with your fingers. Work slowly, smoothing in one motion and try not to go back over an area. Wipe your fingers on the damp rag as you go to clean them.

6. All clean and sparkly!  Plan ahead for this job, as you will have to let the caulk dry/cure for at least 24 hours (36 hours is best) before running the shower!!


Sunday, November 8, 2009

Catching My Breath

I was told once, and not by a paramedic, that it didn't seem as if I was breathing. I hadn't noticed, since I was indeed alive. I think I developed shallow breathing as a defense against the olfactory assault that can be New York City. Hot, steamy subway stations that reek of bleach and urine, fellow commuters--body odor, halitosis, stinky pits and moth-ball-y coats, someone passing gas in an elevator (for the Love of God!), hot tar, restaurant fans belching, the rancid smelling fruit of the female gingko tree, etc... You get the picture. So I learned to hold my breath and take in only as much air as I need to survive. Through further conversations, I also learned that I was holding back, quite literally. And that's not healthy.


I've been conscious of my breathing lately, and I'm breathing more deeply, through yoga, cooking classes and taking the ferry rather than the subway when possible. I'm also more aware because my great friend Ingrid's younger sister, Rebecca, is on a lung transplant list out west. Breathing is a GIFT, and one that we take for granted!


Today, Sunday November 8, was a great day for deep, cleansing breaths! It was 69 unseasonably warm degrees and sunny. I raked the yard and the sidewalk out front. The fresh scent of dirt and leaves was wonderful. After brunch, my friend Jill and I hung out at Gantry Plaza State Park and I noticed that the East River breeze was decidedly briny and refreshing. All that breathing made me aware, and hungry!

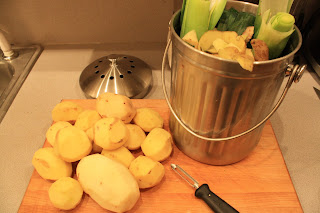
Back at home, I was inspired to make a hearty and comforting autumn soup. My veggie bowl was literally staring back at me--and I thought I better cook sumpin' because the taters were sprouting eyes. I had most of what I needed at hand, just made a quick trip to the store to pick up some leeks and heavy cream. I set about filling the house with lovely aromas.

What you'll need:
6-8 medium sized potatoes (I had 2 russets and about 10 small yukon golds--so I guessitmated)
1 medium onion
3-4 leeks
3 tablespoons of butter
4 cups chicken stock (or veggie stock)
1 cup heavy cream

Cut the root end and tough green leaves the off the leeks, til you are left with about 7"- 8"
Rinse leeks under running water to get any sand out
Dry the leeks (squeeze gently in a paper towel) and slice them very thinly
Peel and dice the onion
In a dutch oven, or other lidded pot...melt the butter and add the leeks and onion.
Cook down for about 10 minutes, til they are very soft and fragrant, but not brown.


Peel the potatoes, remove all eyes and bruises and slice them thinly. Leave some bits of skin, for texture. I already cheated by using boxed broth, so I cut the veggies by hand rather than using the food processor. This is not a race, it's a lazy Sunday afternoon, and I wanted to enjoy making the soup and to have the aromas surround me! Plenty of good veggie ends and peelings for the compost heap!


Add the sliced potatoes to the pot, and pour in 4 cups of broth...just til the potatoes are treading, not fully submerged.

Bring to a boil, then simmer with the lid off a bit to let steam escape...for about 20 minutes. Check the potatoes for doneness.

Use a potato masher (or an immersion/stick blender) and mash or blend the soup to the consistency you like. I like it a tad lumpy and rustic.


Add 1 cup of cream, stir in. C'mon it's comfort food! Season with freshly ground sea salt + pepper to taste.
And...breathe!

Tuesday, November 3, 2009

Invisible Fences

Today I was reminded of Robert Frost's poem, "Mending Wall"

"...He only says, 'Good fences make good neighbors'...
...Before I built a wall I'd ask to know
What I was walling in or walling out,
And to whom I was like to give offence.
Something there is that doesn't love a wall,
That wants it down..."

Living in a row of 12 or so houses (I always forget the # of houses though I've counted them over these 20 years), we neighbors live in close proximity. Long Island City is just 5 minutes out of midtown Manhattan, but we may as well be in some far flung suburb. I have neighbors to the right and to the left, yet life here is very quiet. I'm typing this at 10:30pm with the window to my office open to the yard(s), and all I can hear is the sporadic whoosh of a passing car, the far off whistle of the train and a windchime moving in the slight breeze. It's November...so no more crickets! Through the walls that connect our homes, I might hear a stray phone ringing, J.R. my neighbor's dog running all clickity on the wooden steps down to the basement, some music, a random raised voice, the sound of a crowd gathered for a party.

Frankly, I have only heard screaming, once. It was very alarming. I leaned out the window and called out to find out who it was. I couldn't see anyone, and no one answered me. It stopped before I would have called the police. I found out later that it was Sheila next door--a storm window had slammed shut on her fingers and she was yelling from inside that she could not open the window. Brian wasn't in the house, her dog was no help, nor was I. I couldn't make out any words, or tell where the muffled screams were coming from. I felt terrible when she told me afterwards!!!

The walls are not "thin" but the sounds of life being lived creates a gentle hum (99% of the time!)


I tacked some stockade fencing on to the chain link to warm it up a tad.

The yards are about 15 feet wide and 40 feet deep, and separated for the most part by old and rusty 4' high chain link fencing. It's more of an invisible fence than a wall that keeps in or keeps out. The ivy and morning glory vines have made it kind of a living fence, so I'm not bothered by the chain link.


Sheila and I have talked about the "someday soon" when we'll confer about a common replacement--probably wood, definitely NOT that shiny white plastic fencing. And we'd have a doorway...so we can access one another's yards, sharing the space for gatherings, either together or independently. We've both strung white bulbs around the perimeters and we turn the lights on if we know the other has guests. It feels like Napa or Tuscany...in Queens.


Sheila can reach over and snip herbs anytime!

We pass little tastes of food over the fence, and share in each other's gardens. Rosemary, sage and mint from my side... dahlias and basil  from Sheila and Brian, grilled pizza from Franny and Bobby on the other side. For my birthday one year, Sheila passed a pineapple to me. The symbol of hospitality. I whipped up some pineapple smoothies and handed two back over the fence. Loved that!

We miss Francesca terribly--our sweet neighbor who was widowed and passed away in her 80's last year. We all pitched in to sweep or shovel the snow when it was too much for her. She'd look for me when I'd get back from a business trip and say in her heavy Italian accent," I worry, I no see you! You worka too hard."

A few weeks ago, Sheila was grilling and shared some freshly made kielbasa from Greenpoint, Brooklyn. I passed over some of my killer potato salad and I think some brownies. The other day, I was the happy recipient of ratatouille--a perfect blend of zucchini, eggplant, red peppers and some winning spices.
I warmed the ratatouille up tonight and it was the perfect accompaniment to sauteed spinach and baked halibut.
"Something there is that doesn't love a wall, That wants it down." I couldn't have said it better myself!
We don't seem to need 10 foot privet hedges, "Keep Out" and "No Trespassing" signs here in our little row.

Falling into Winter

It's early November, and the weather is crisp and sunny, but not cold. Time to do the first pass on winterizing the yard. I've taken the mango wood table apart and stored it with the chairs in a den closet. I didn't realize I had that kind of room in there! I purged a lot of stuff this Fall, had a tag sale or two and I'm happy to say that I don't need to pay for a storage unit any more ;-)


I'll make room in the cedar shed for all the garden guys.

I took the last tomatoes off the vine. They've stopped growing, so I'm letting them ripen indoors. They're so good to roast, to pop into a salad, to slice on a sammie or toss into an omelet.


 I raked the leaves, put them in the compost bin, and pruned the weeping cherry tree--there were some crossing branches and some dead limbs.


I loosened the dirt to plant bulbs, and had to switch to the other side of the yard, pronto. I dug up some fat, fuzzy, drowsy bumblebees completely by accident. I covered them back up and hope that I didn't ruin their nest.


Bulbs need a cold period to develop roots and to flower well in the Spring. Plant them 6 weeks before the ground hardens and there is a steady frost.


I plant some in bunches like this for a profusion of color, and some are more spread out...in a single layer.  One wrinkle to this lovely autumn tradition, bulbs are very attractive to squirrels and chipmunks. They rely on their sense of smell and they discover newly planted bulbs when they are burying their food stores for the winter. Chipmunks store food in one place, and squirrels are more scattered...forgetting where they dug, so they have many areas with nuts buried. They both love crocuses and tulips, but find daffodils distasteful. A cat or a dog can chase them away from the yard. I have no pets and I learned the hard way not to leave bulbs unprotected!

There are lots of 'remedies' for keeping these curious critters away...ranging from rolling out, cutting and anchoring chicken wire or mesh hardware cloth, to sprinkling cayenne pepper in the bulb hole and on top of the dirt, to spreading feline-urine soaked cat litter on top (yuck!) or placing a layer of human hair. That's even more yucky! I cannot see going to a salon to request a bag o' hair. And in NYC I think you'd have more than just squirrels digging up the yard---it might attract cops!

I have a simple solution. I buy a roll of fiberglass screening, and cut it to fit over the areas where I've planted bulbs. It's soft and easy to cut.


I weigh the edges down with bricks or firewood, and I take the screening up in March...when I can see the teeny beginnings of sprouts coming up.

Spread a layer of leaves on top to keep warm, and your bulbs will be disguised and safe from predators!


Leftover Paint

Have you ever opened an old can of paint, and rust fell into the paint once you pried the lid off? Fished out the big pieces, gave it a stir and used it anyway? I admit that I have, in a pinch!

Now when there's paint left over from a job, I consolidate it into smaller, clean containers, and clean the paint out of the rim before I tamp down the lid. For touch ups I find that it's handy to have paint colors from each room and hallway, extra ceiling paint and a spare pint of ultra pure white semi gloss. I like to freshen up the window sills once a year...they get a little grubby with the dust in our city air.
I guess you could poke through that thick layer, but....don't do it.


This is so gross, I had to dig it out to show you! I'm sure it will cross my mind the next time I order flan for dessert...  

You can buy spare quart, half gallon and gallon-sized paint cans and lids at a home improvement store. Like Tupperware for your leftover paint! You'll keep the paint fresher and you'll save on space. Write the room brand of paint and color on each can and lid with a Sharpie.


I have a Home file where I save the "paint chips" from the paint store, so it's a snap to have more made up. Simply jot down the finish at the time you first buy the paint--eggshell, satin, flat, semi gloss or high gloss--so you don't have to guess.

Monday, November 2, 2009

Drywall Repair: Taping, Floating, Sanding and Re-Painting

This is Post #2 of 2, of the Nor'Easter rain damage repair. My roofer determined that water came in from a crack in the base of the fireplace chimney flue on the roof, which is situated over my bed. It was crucial that we identify the problem and address it asap, before more autumn rains and winter snow! The rainwater that dripped in onto my pillows was brown, after running along the rafters. Nasty!! Once he found and fixed the source of the leak, it had to dry thoroughly inside, to make sure no mold grows in the wood rafters or the insulation between the ceiling and the roof.


The water ran along the drywall seam on the ceiling. It doesn't look too bad in the photo, but I'll be repairing 3 feet of drywall (also called sheetrock.)

Tools needed:
Ladder
Dropcloth
Taping knife if you have one, or use a wide joint/putty knife. I re-use a disposable plastic taping knife.
Sandpaper, fine grade (so you don't leave gouge marks)
Safety Glasses (wear while sanding, so airborne dust does not get in your eyes)
Disposable Paper Face Mask (wear while sanding, so you don't breathe in airborne dust)
Premixed Joint Compound (pros call it "mud")
Drywall tape (there is classic paper tape, but adhesive backed mesh drywall tape is easier to use)
Mud pan (it's long and narrow, and gives you the room you need to work the mud and load up the knife)


1. Move furniture (in this case the bed) cover it and the floor with a dropcloth and use a ladder for this repair. Solid footing is essential. No sense in getting hurt or making a mess!
2. Dig under the open seam with the putty knife to remove the paint around the damaged seam...go about 3" in each direction to create a repair area. Luckily, the damage wasn't as bad as I thought it would be and I only removed 2" on either side of the seam.


3. Sand lightly to smooth any rough bits. Adhere the tape and press it along the length of the seam.


4. If you can frost a cake, you can do this! Spread a layer of mud over the tape, and feather the mud out an inch or 2 past the repair area--let the joint dry for 24 hours. It dries light gray. Sand down any ridges. (You can buy yellow tape, and pink mud that dries white---foolproof signals to sand and paint when it's fully white...but I go with the standard white adhesive mesh tape and gray mud.)


5. Be patient--you still have to "float" or spread enough mud to cover the entire repair area, and the tape... so it's flush with the ceiling around it. Apply a 2nd coat of mud at this point.

6. Let it dry for 24hrs, then sand. If it is transitioned smoothly, you will not see shadows and imperfections when a flashlight is shone. It's worth the extra effort.

7. With a paint roller, apply two coats of Kilz primer, and let dry 30 mins. It covers very well and has a mildew inhibitor.

8. Apply 2 coats of ceiling paint...and feather the paint out for full blending with the original job.  Good as new. Let it rain, let it snow!



9. With the $ you saved by not hiring a "handyman," treat yourself to some fluffy new pillows and bed linens!